
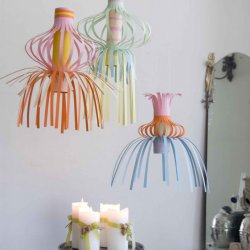
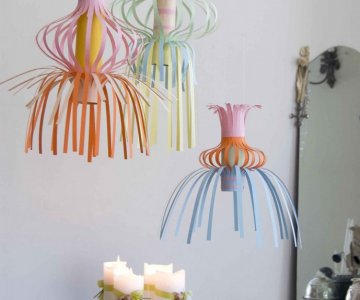
Paper lanterns...
These "lanterns" will bring back memories from your childhood, or at least mine..
Se næste indlæg >
Paper lanterns
Paper lanterns…
These “lanterns” will bring back memories from your childhood, or at least mine…They were made in all kind of shapes and colours back in the 70’ies.
And with all the vintage look on the interior trend…I guess these will fit in again today. If you want them a bit more glamorous you can choose gold or silver metallic paper. Or maybe go even more vintage and make them of 70’ies wallpaper.
These are a bit advanced, but you can simplify if you find them too much. 😉

paper lanterns, peekaboo
You will need this :

-Paper in your selected colours
-toilet or kitchenpaper rolls
-tape
-glue stick
-scissors, hobby knife and a ruler
This is how you do :

1.Start by adding two toilet rolls on top of each other, and use sticky tape to hold them together.
 2.Cut one piece of A4 on the middle, so you get two pieces of A5 instead. Cut a bit of the height and glue them onto the toilet rolls.Here you choose the colour you want inside your lantern.
3.Take a piece of A4 in another colour. The colour you want on the middle of your “lantern”. Measure the circumference of the toilet rolls.Add 1 cm and cut this as the width and 25 cm in the height.

4.Cut strips on the height. Start and stop 3 cm from the edges.Each strip has to be 0,7 cm. And remember you have 1 cm extra so don’t cut there, it is for gluing on the other side.
 5.Glue the 3 cm ends to the end of the roll.
 6.Now you have to make the bottom fringes, they have to be open in one side, and closed in the end you glue onto the roll.So cut in a new colour the circumference of the toilet rolls and add 1 cm and 15 cm height. And from 2,5 cm from edge you cut the strips 0,7 cm wide and this time all the way through.
 7.If you like you can make one more which is 10 cm longer, but do same as before.
8.Glue the shortest on first and afterwards the longer version.
9.If you strips will not fold nicely you can curl them with your curling iron.


No comments yet