
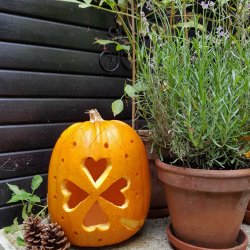
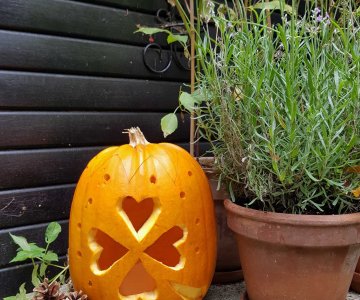
[caption id="attachment_3398" align="aligncenter" width="1417"] Pumpkin lantern with four-leaf clove
Se næste indlæg >
Tekstiltryk med efterårets blade. DIY print with autumn leafs.
Noget af det smukkeste ved efteråret er skovens blade…De er begyndt at drysse om ørerne på os, hvilket minder os om at det snart bliver koldere, og træerne vil stå nøgne hen vinteren over. Ikke desto mindre er det betagende med de brændte gule over i dybrøde farver, som i en kort periode bliver skovens farver inden de helt forsvinder.
One of the beauties of fall is the fading leaves of the forest … They are starting to fall, which reminds us that it soon gets colder and the trees will be bare over the winter. Nevertheless, the stunning sight of the forest with the mustard coloured leafs and deep red colours, which will be the forest colours for a short periode before they completely disappears.

Tea towel with printed autumn leafs. Easy craft you can do with your kids.
Jeg greb et par ahorns blade og et par bregne vifter, og brugte dem til tekstil tryk, så jeg kan nyde dem hele vinteren. Se med her, hvordan man gør.
I grabbed a couple ahorns leaves and a few fern fans, and used them for textile printing, so I can enjoy them all winter. See here how to do it.
Dette skal du bruge / you need this:
Palett tekstilfarve / Textile paint (Panduro hobby)
Nogle blade/ some leafs
Lyst bomuldsstof / cottonfabric in a light colour (Ikea)
tråd i matchende farve/ Thread in matching colour (Ikea)
et lille stykke grosgain bånd/ a small piece of textile tape.
Sådan gør du / how to make it.
Kom tekstil farve på bagsiden af dit blad. Du skal lægge det i et jævnt lag. Brug eventuelt en svamp. Add textile colour on the back of your leaf. You have to put it on an even layer. If necessary, use a sponge.
Tryk blad mod stoffet. Du kan eventuelt lægge et stykke papiir ovenpå og kører en kagerulle hen over for at sikre at det bliver presset jævnt ned. Press the leaf against the fabric. You may want to put a piece of paper on top and roll a rollingpin over to ensure that it is pressed down evenly.
Use the autumn leafs for printing on textile.
Lad det tørre. Stryg herefter på bagsiden i 5 minutter….( husk ikke samme sted i 5 minutter, men jævnt over hele stoffet.) og ved høj varme til bomuld. Allow to dry. Then, iron on the back for 5 minutes …. (remember not the same place for 5 minutes, but evenly throughout the fabric.) And at high heat for cotton.
Now cut the fabric in the size you like.
Nu er printet fixeret, og du kan klippe de stykker ud du skal bruge, til viskestykket har vi klippet det 54 x 69 cm. Det ender op med at være 50 x 65 cm. fordi du på alle kanter har 2 cm. sømrum. Now the print is fixed, and you can cut out the pieces you need to your tea towel, the piece we cut it 54 x 69 cm. It ends up being 50 x 65 cm. because you have 2 cm. seam allowance on every edge.
Fold the edges and iron them.
Buk kanterne ind 1 cm. to gange. Stryg det. Fold the edges 1 cm. twice. Iron it.
Add the loop in the edge.
Klip et stykke grosgain bånd i en længde, der passer til dit hjørne på viskestykket. Læg det under sømrummet. Cut a piece of grosgrain ribbon into a length that suits your corner of the towel. Put it under the seam allowance.
Stitch the seams down on all edges.
Stik nu kanterne ned hele vejen rundt. Now stitch down all the edges.
Tea towel with diy leaf print for your kitchen.
Nu er dit viskestykke klar til at indtage køkkenet med efterårsstemning. Now the tea towel is ready to decorate your kitchen with a fall feeling.
Den samme teknik kan bruges til dette pudebetræk. Her skal du blot have stencil til bogstaverne og en lynlås til bunden af betrækket. Men ellers laver du printet på samme måde og syr dit pudebetræk som du ellers ville. Og er du ikke en haj til at sy, så kan du jo også købe et færdigt pudebetræk og trykke på.
The same technique can be used for this pillow cases. Here you just need a stencil of letters and a zipper to the bottom of the cover. But the printing process is the same. After printing you sew the pillowcase. And if you don’t want to sew the cover, you can also buy a finished pillowcase and print on that.
Pillowcase printed with leaf and stencil letters.


Åh, dette var fint. Det MÅ jeg få tid til ila efteråret:-)
Birgitte